The Defiant© Roadster Build Notes
 The basic parts of the Defiant EV3© Roadster are a WarP motor, controller, Exide batteries, VW transaxle, a modified VW front end, and a chassis from Berrien Buggy. Our prototype uses pre 1965 components. This means a Link and Kingpin front suspension and a swing axle rear suspension. Later versions can be used, you just need to know which versions you have to order the correct chassis from Berrien Buggy.
The streaming video on this web site requires the free RealPlayer� plug-in. The RealPlayer� is the leading Audio and Video Technology on the Internet today. The RealPlayer� is not only used on our site, but all other cutting edge audio/visual sites on the Internet!

Click on the free RealPlayer� icon to download a copy of the program. The program is easy to install and only takes a few minutes to download.
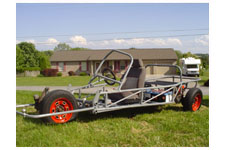
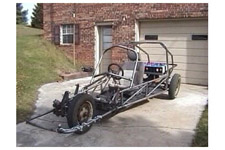
Rolling Chassis
Over the past few months we have continued our testing and the design has continued to evolve. As you can see, the boxy look and the high rear roll bars are gone. The fast back style has been replaced by a sports car/roadster look. We have recruited an artist to create a new rendering of the body and we hope to have those drawings complete in a few weeks.
I want to take this opportunity to thank the EV enthusiasts that have taken the time to fill out our survey. Many of the design changes are a direct result of your comments!
Motor Installation
 In this video, we install the high-speed motor. This motor can operate on 120 volts, produce 8 horsepower, and it should turn more than 5000 RPM, providing a (theoretical) top speed of more than 90 MPH! (Remember, an electric motor can produce 4 to 6 times its nominal horsepower for brief periods of time.)
The video also shows the miniature driveshaft that connects the motor to the transaxle. Finally, we show three different motor mounting systems.
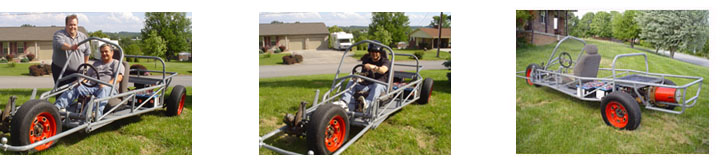
Preliminary Testing
We are proud to announce that we have begun preliminary testing. While we are taking a prudent, cautious approach to the testing, we are pleased with the speed, acceleration, and general handling of our car.
At the present time, we have the power limited to 30%. However, we were able to produce more than 30 horsepower (36 volts and pegged the ammeter at 600 amps) climbing a hill. We hit a top speed of 40 MPH. Definitely not a speed record, but with 70% more power available to us - certainly the ultimate performance will be truly astounding!
Rolling Chassis
The chassis is pretty much complete, thanks to a superb effort on the part of our master fabricator, Larry, at the Speed Shop. Unfortunately, Winter is catching up with us and while we will continue our design and building of the custom body, very little actual testing will be done during the harsh East Tennessee Winter.

Custom Fabrication ~ the Front Wheel Hoop
Just like the chassis came with an Engine Hoop to protect the engine, we had to design and create a Front Wheel Hoop to protect the front wheel. The hoop was notched to fit tightly to the chassis's Front Beam. As the hoop runs next to the steering assembly, it was "gorilla welded" to the to the assembly to provide added strength. The Front Wheel Hoop also serves as the front bumper. Two trailer hitch balls are mounted to the bumper to accommodate the custom, quick release, "Y" tow bar I created decades ago to tow my first street legal electric car.
Custom Fabrication ~ the Battery Rack
The prototype is powered by 10 Exide Deep Cycle Orbital batteries located over the transaxle. However, our vehicle has ample room for batteries. If more range is required, batteries can be mounted over the motor, or in trays on both sides of the driver. In addition to the battery rack installation, this video also shows a bit about the front seat.
Custom Fabrication ~ It's All About Control
The chassis is upside down! In order to finish the bottom side of the welds and to tack the floor pan into place, the chassis was rolled over onto its top. The video begins with Larry and John rolling the car back over onto it's wheels. It's all about control, and key parts of this video show Larry welding the steering, brake master cylinder mount, shift box and linkage into place.
Custom Fabrication ~ the Front End
This video begins with Larry welding in place the additional braces that were included in the chassis kit. The next step was to weld our highly modified windshield frame into place. Finally, we begin the front end modifications that are critical to the success of the car. Additional video of the front end modifications will be on the CD-ROM included in the build manual.
Custom Fabrication ~ the Windshield
We've moved the chassis to the Speed Shop where the owner, Larry, is doing our custom fabrication. The first item on the agenda was to modify the windshield frame that was included in the kit from Berrien Buggy. SInce we are moving the windshield forward, it's necessary to narrow the base by putting a shallow "V" in the frame. First, the bottom brace was removed and bent using a tube bender; then the top of the frame was bent. Finally, the windshield was re-assembled.
The Chassis - Get It Level Then Weld
The chassis arrived from Berrien Buggy and we could hardly wait to start our custom fabrication! In just a few short hours, we had about 90% of the chassis tack welded. I have to say the chassis was all we expected and came together perfectly. The parts were pre-cut and part of the frame was tack welded from the factory. This helped ensure the frame was perfectly aligned. However, it was still up to us to make sure the frame was level. That took a bit of effort, mostly because the rear end was not completely disassembled as suggested in the instructions and the driveway we were building on was slopped in two different directions! As you'll see in the video we managed to get it perfectly level and ready to weld!
A word of caution, it's easy to get the hang of welding... but it takes a lot of experience to be good at welding, so as a home build project, it's okay for you to tack weld everything together; but, if you're a welding novice, make sure that you take the project to a professional for the final welds!
Fun With Power Tools
This video shows Xander using one of his favorite tools to cut the VW transaxle away from the motorcycle "trike" that was one of the donor vehicles. Xander also talks a bit about engine removal.
Our vehicle design calls for using a standard VW transaxle, without the clutch. Some designs eliminate the transmission and simply use a fixed gear ratio. I personally believe it's important to retain the transmission in order to improve the overall operating efficiency. However, the clutch is not necessary, and in fact, might cause the motor to self-destruct! If the clutch was accidentally depressed while the motor was under full load, the motor could suddenly over-speed and exceed the maximum operating RPM. When shifting without a clutch, about the only difference you will notice is you have to shift a little slower. The transaxle shaft should be modified to allow the motor to fit closer to the transaxle. You need to cut the tip off the end of the transaxle.
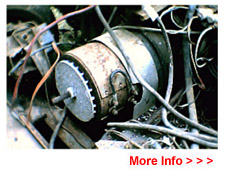
A Salvage You Have To See To Believe
Xander and I salvaged some parts from an electric car project that I had abandon more than 20 years ago. We shot video of me testing the motor that had been untouched for all those years. The video is a testament to the durability of an electric motor. This video not only shows the motor working (and actually moving the car!) but I also explain some of the key concepts of an electric car and some of the basic design philosophy behind the EV 3 "purpose built" electric car we are developing.
Find out more!